
[How-To] Add Motion Blur to a Video
- Victor Lim

- Oct 20, 2022
- 3 min read
INTRODUCTION ^
In the previous post on "How to De-Flicker a video", we talked about using masking to eliminate excessive motion blur on fast moving subjects. What if... Motion Blur is your intended end result? I must stress beforehand that the motion blur I am referring to is not primarily about adding motion blur to emulate the 180 rule, it is more like adding motion blur on purpose to moving target(s) as a form of visual effect.
Interestingly, the steps are somewhat similar to the previous post mentioned above but we will be using the Slip Tool from Adobe Premiere Pro to achieve the final result. Final Cut Pro and Da Vinci Resolve uses the Trim to achieve the result which I won't be covering in this post. Both methods can achieve the same results.
SOLUTION ^
You will need a PC or a Mac in this case with a decent video editing application like Adobe Premiere Pro, Final Cut, Vegas or the free to use Da Vinci Resolve. I will be illustrating it using Adobe Premiere Pro but if you are using other application, you can still follow through with it because the basic idea behind it can be achieved on any of the applications above. The only difference simply lies with the UI and workflow.
1. Open up Adobe Premiere Pro or in your case the application of your choosing but you just need to ensure that the application you pick supports the following: (i) Layers (ii) Opacity Setting. That's it! 2. Select the clip you want to add some motion blur to and create a composition from it.

2. Duplicate the clip twice and put the duplicated clip on top of the original clip, rename it so that it is easy going forward.

3. Press V to select the Slip Tool. Select Duplicated 1 on the Composition Timeline, click and move the mouse right to show +00;00;00;01 which basically means 1 frame forward. Select Duplicated 1 and go to Effects Control where you can adjust the Opacity. Toggle Animation and make sure this is disabled. Set this amount to 66%.


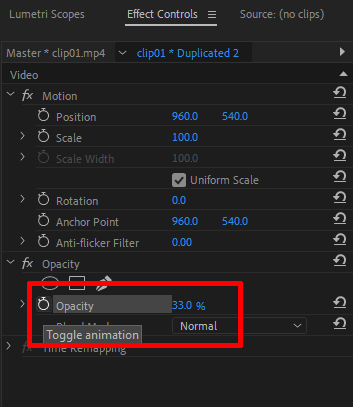
4. Do the same for Duplicated 2 but for this move the mouse left to show -00;00;00;01 which basically means 1 frame backward. Select Duplicated 2 and do the same to the Toggle Animation but this time round, set the Opacity amount to 33%.

5. Trim the excess and clean up the gaps. Do it to the start and end.

6. Let's check out the result.
7. Noticed that this provides too much motion blur due to the fast movement of the bicycle and this doesn't look natural. There is a way to solve this. Speed up the clip. You got to experiment with the amount and judge things for yourself. For this clip, I set the speed of the clip to be 200%.
8. Let's check out the before and after adding of the motion blur.
DOWNSIDE & CONCLUSION ^
The biggest downside of this method of adding motion blur to a video is there is no magic number to the speeding up of the video or maybe even the need to speed up the video. The best magic number is your own judgement.
Another thing is that this method doesn't always work on anything. It all depends on the nature of your video in terms of the motion of the subjects in your video and velocity of it.
When used correctly, this method can produce amazing results but just try not to apply it on every single videos you can lay your hands on. The best way of producing a cinematic motion blur (the famous 180 degree rule) is to do it right from on your camera.
Comments