
[How-To] De-Flicker a video
- Victor Lim

- Oct 9, 2022
- 4 min read
INTRODUCTION ^
It doesn't matter if you are an advanced user or a total beginner with videography because one of the most annoying issue to ever plague the industry is the flickering in the video due to artificial lighting.
Why artificial lighting you may ask??? Long story short, it is best explained by comparing the artificial lighting against our Sun. Our Sun is our consistent source of lighting and when I said consistent, I meant it. Even if the Sun does flicker, it is too close to us to even notice it. The artificial light on the other hand, being powered by the AC power supply, is a series of cycle with in and out current of the circuit.
Before I confuse you further, Red.com explains it the best. Do go and check it out if you are interested.
Let's head straight into how are we able to De-Flicker a video after it was shot. It's after all save it or throw it straight to the recycle bin.
SOLUTION ^
Solution 1 is not what we will be talking about which is to do it correct right out of the camera. There is a whole new science about that which I can do it on another post. Solution 2 is what we will be digging deeper into.
Solution 2 is about attempting to De-Flicker it in post-processing, to save it after the shot was taken. This may not be the best way to handle the flickering issue because what I am about to show you is not fool-proof and may not always work. Despite that, it is in my honest opinion a very good technique to pick up because you never know when it will save your life or your work in this case.
You will need a PC or a Mac in this case with a decent video editing application like Adobe Premiere Pro, Final Cut, Vegas or the free to use Da Vinci Resolve. I will be illustrating it using Adobe Premiere Pro but if you are using other application, you can still follow through with it because the basic idea behind it can be achieved on any of the applications above. The only difference simply lies with the UI and workflow.
1. Open up Adobe Premiere Pro or in your case the application of your choosing but you just need to ensure that the application you pick supports the following: (i) Layers (ii) Opacity Setting (iii) Mask - Optional. That's it! 2. Select the clip you want to De-Flicker and create a composition from it.

3. Duplicate the clip twice and put the duplicated clip on top of the original clip, rename it so that it is easy going forward.

4. Zoom the composition in as much as you can. Make sure that is the max you can zoom in.

5. Move Original just 1 frame forward. Move Duplicated 1 just 1 frame ahead of Original. Finally, move Duplicated 2 just 1 frame behind Original which is just leave it as it is.

6. Now this next part might look slightly different depending on which application you are using but the idea behind it is the same. 7. Select Duplicated 1 and go to Effects Control where you can adjust the Opacity. 8. Toggle Animation and make sure this is disabled. Set this amount to 66%.

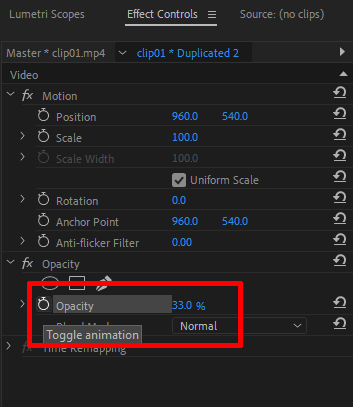
9. Next, select Duplicated 2 and do the same to the Toggle Animation but this time round, set the Opacity amount to 33%.
10. Trim the excess and clean up the gaps. Do it to the start and end.

11. That's it! Check out the before and after.
SIDE EFFECTS ^
This method of De-Flickering is not without its side effects. For video clips that contains fast moving action, it causes unnecessary unwanted motion blur unless you (a) Paid money to buy some awesome plugin to De-Flicker it or (b) Mask away fast moving action(s) on Duplicated 1 & 2. I am not going to show method (a) but instead method (b). If you are not comfortable using Masking, you can stop right here and proceed to Conclusion or you can read on the next section. Be warn again, the next section is quite advanced, just make sure you know before hand how to use Masking.
MASKING ^
1. Identify the part of the video on Duplicated 1 & 2 that contains fast moving action that you need to mask.

2. This part may differ depending on what video editing application you are using. Select Duplicated 1 and to Effects Control. Under Opacity, create a mask.

3. Next, select the Pen Tool and start tracing the section around the fast moving part.

4. Add in some feather, just a tiny bit. Use your own judgement on the amount that but just make that feather is just slightly there. Check Inverted.

5. Do the same for Duplicated 2. To make things easy, you can select the Opacity and just paste it from Duplicated 1 to 2. 6. Check out the before and after.
CONCLUSION ^
That's it! I just provided you with a quick way to De-Flicker a video with an optional advanced technique to mask away fast moving section to prevent excessive motion blur from ruining the video. If you are a total beginner with only some basic skill in video editing, the solution I have provided will be good enough to deal with most flickering issue provided there are no fast moving object(s) in the scene, if not, you will either need to buy some advanced plugin to remove those flickering or simply just use the advanced technique to deal with it, Masking.
The best way like I mentioned at the start of the article is to do it the right way out of the camera which I will cover that that in future if there is demand for that. Feel free to ask me any question(s) in the comment section and I will try my best to answer all of them.
Comments